NEW DIGITAL VS. FILM TEST! - CANON 5D MARK II VS. 35MM KODAK
Now, for the moment we have all been waiting for... Drum roll please? This is the real deal! The match of the century! The grand pumbah of showdowns! This is digital vs. analog... Digital Sensors vs. Silver Halide or From Raw to Riches!
So after talking about it for a long time and continually having no time, suffering from habitual laziness and a desire to spend as little time at a computer as possible, we have finally gotten around to doing a no holds barred comparison of film versus digital on as level a playing field as possible. So many people have naive misconceptions about film and digital and what they have to offer to photography. Almost every comparison online shows unfair samples of digital captures with full control in RAW, against inferior scans or prints from inferior film stocks. And any editorial publication has a vested interest to sell the product that is lining the pockets of the manufacturers financing their distribution, but we don't have time to get into the politics here. So we felt obliged to balance the scales, to show a controlled study focusing on the suppressed advantages of analog capture. But before we get started with our study, a little background if you please...
I have myself been a die hard film fanatic ever since I started photography, despite the opposition from others, and up until about a year ago I wouldn't even think of picking up a digital camera. Despite what people were saying and showing us concerning the capabilities of digital, we knew what we were getting on film was superiorly suited to fulfill our needs. For over the past year now I have been shooting with a Nikon D300 at my church. It is the church's camera and if I had never started working there I would most likely had never taken the plunge into digital in the first place without more comprehensive technological developments. I'm just too thrilled and in love with film! Don't get me wrong here... I have been experienced in digital for the past few years. We use a hybrid work flow utilizing the benefits of both analog capture and digital finishing. Not unlike that which Hollywood uses for motion pictures. We know Photoshop and color management and we have experimented with excessive post-production on our work. Brian also worked with many local professionals at at lab between the transitional years of 2001-2006, and aided many of them down the slippery slope as they degraded their work to digital. Many pitfalls were avoided, but some casualties were unavoidable. But what it comes down to is, as you will see for yourselves, film has qualities that digital simply cannot touch.
Since I started shooting with the D300 I have experimented way, way too much! I've tried so many different methods of RAW processing using a variety of different programs. I have reached out to the world of digital imaging for ways to get my digital photos to look like my film and have found some really impressive stuff. Recently a lot the digital world has given their attention to film emulator software and Photoshop actions that attempt to create the feel of film digitally. I find it curious how the same people who hold that digital is so much better than film are the ones buying all of these filters, analog emulators and pretend film borders. The fact is most of their work is better now for it! But why bother with all the fuss? Why not go with just what you're looking for? "Well, digital has such high resolution and the 24 megapixel..." Blah Blah blah. You will see that nearly anything digital claims to have over film is either illusory or trite or just plain made up! I will show you.
Am I saying digital has no application in the professional world today? I am not that naive. I have found many applications for digital to excel; from product photography in the sterile studio to daily news photojournalism requiring immediate turnaround. Or even in portraiture; weather it's school photos or big budget editorial shoots with equipment lists pushing six figure price tags. Digital seems to have become the only option for these jobs (even though some photographers still shoot these jobs on film today). But film is the only true fine art giving absolute creative control and ability, and it is the only truly archival process. Film can be left in storage (e.g. archived) for 200 years and still be scanned with whatever the current technology is at the time. With digital you must keep updating the file format, degrading the image quality and risking file corruption.
So without further adieu...
Analog vs. Digital
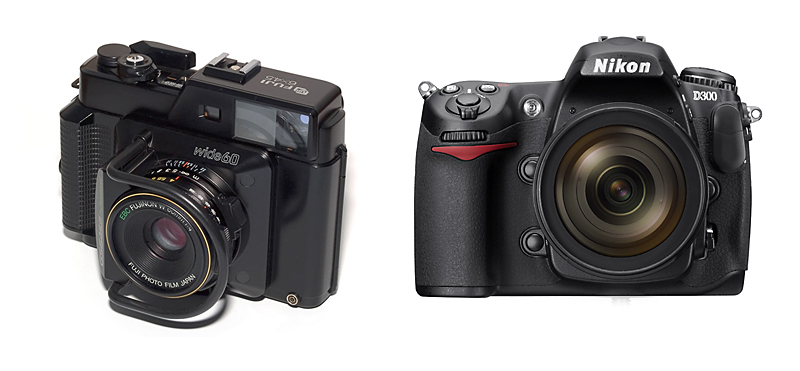 To start off, I will explain my process so that you can make sense of the images. As mentioned before I decided to use the Nikon D300 camera body. I also decided to pair it up with the 17-35mm f/2.8D ED-IF AF-S lens so that I could best match the focal length of the film camera I would be using. That setup would cost you roughly $3,400 new. Quite a lot of film! Our film camera here is the fabulous Fuji GS645s 6x4.5 Rangefinder Camera with it's fixed Fujinon W 60mm f/4 lens which is roughly equal in focal length to 28mm on the D300. This camera cost me a whopping $289 on eBay! But it does say professional on it so lets assume it's a worthy contender against the more expensive D300. For film I used one roll of Fuji Reala 120 ISO-100 print film. I am not using slide film because this is a study on the flexibility and simplicity of capture. And to be honest I think negative film has become the only way to shoot as far as quality and flexibility these days. Slides, like digital, must be used only in controlled lighting. Impossible for a wedding or travel photography. So... I matched the ISO and shutter speeds on the D300 to be correspond to the film captures for each exposure. Each scene I made 3 exposures; one correct, one -2 stops and the third overexposed +2. This was because when you are shooting moments, which is what the majority of photography is, it is often impossiable to recreate that moment because the lighting changed and you had to look at your histogram to know it. I shot all the photos at f/8 from a tripod to make sure they would all be sharp.
Processing for the digital was as follows:
1. Capture Digitally
2. Remove memory card
3. Transfer RAW files onto my iMac's hard drive at home
4. Open images in Photoshop RAW
5. Adjust Exposure, Brightness, Temperature, Contrast and Saturation for optimal image quality preserving as much highlight detail as possible
6. Open into Photoshop
7. Adjust Levels to match film scans
8. Adjust Color Balance to match film
9. Save file to desired location
10. Repeat steps 4 through 9 for each image
11. Backup all raw and processed files to external hard drive
These digital files haven't been processed extensively to look their absolute best but neither have the film files. Post-processing styles vary greatly from photographer to photographer. These were merely processed to somewhat match the film and to maintain as much dynamic range detail as possible. Same is true for the film scans. Density(film)/exposure(RAW) was adjusted for the over and underexposed shots to match the correct exposure.
Processing for film is as follows:
1. Capture Analog
2. Remove film
3. Drop off at (or ship to) local photo lab
4. Pick up (or receive by mail) scans and processed film
5. Open files from CD in Photoshop
And that's it! No further adjustments necessary! But you can go from there and do whatever your heart desires. :) My film is already backed up on negatives which are analog, low tech and archival to last 200 plus years! Now which process seems like the more efficient use of a professional's time? Hmmm... I know very few professionals who are comfortable farming out their post-processing work to someone else. A digital professional's "style" is usually shaped by their unique approach to post-processing. I.E. Trever Heone.
The film scans were done on a Fuji Frontier scanner with no variable contrast setting, and no enhancements whatsoever. The only control was exactly what control you have when printing color in the darkroom: + or - density, R or C, G or M, B or Y color adjustments, and that's it.
So are you all ready to see the results? Well you asked for it!
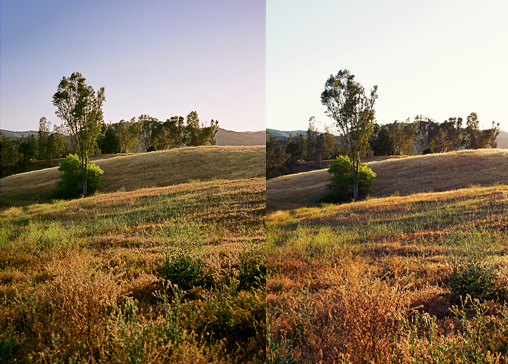
Let's start with an easy one shall we? The back-lit landscape.
FILM
To start off, I will explain my process so that you can make sense of the images. As mentioned before I decided to use the Nikon D300 camera body. I also decided to pair it up with the 17-35mm f/2.8D ED-IF AF-S lens so that I could best match the focal length of the film camera I would be using. That setup would cost you roughly $3,400 new. Quite a lot of film! Our film camera here is the fabulous Fuji GS645s 6x4.5 Rangefinder Camera with it's fixed Fujinon W 60mm f/4 lens which is roughly equal in focal length to 28mm on the D300. This camera cost me a whopping $289 on eBay! But it does say professional on it so lets assume it's a worthy contender against the more expensive D300. For film I used one roll of Fuji Reala 120 ISO-100 print film. I am not using slide film because this is a study on the flexibility and simplicity of capture. And to be honest I think negative film has become the only way to shoot as far as quality and flexibility these days. Slides, like digital, must be used only in controlled lighting. Impossible for a wedding or travel photography. So... I matched the ISO and shutter speeds on the D300 to be correspond to the film captures for each exposure. Each scene I made 3 exposures; one correct, one -2 stops and the third overexposed +2. This was because when you are shooting moments, which is what the majority of photography is, it is often impossiable to recreate that moment because the lighting changed and you had to look at your histogram to know it. I shot all the photos at f/8 from a tripod to make sure they would all be sharp.
Processing for the digital was as follows:
1. Capture Digitally
2. Remove memory card
3. Transfer RAW files onto my iMac's hard drive at home
4. Open images in Photoshop RAW
5. Adjust Exposure, Brightness, Temperature, Contrast and Saturation for optimal image quality preserving as much highlight detail as possible
6. Open into Photoshop
7. Adjust Levels to match film scans
8. Adjust Color Balance to match film
9. Save file to desired location
10. Repeat steps 4 through 9 for each image
11. Backup all raw and processed files to external hard drive
These digital files haven't been processed extensively to look their absolute best but neither have the film files. Post-processing styles vary greatly from photographer to photographer. These were merely processed to somewhat match the film and to maintain as much dynamic range detail as possible. Same is true for the film scans. Density(film)/exposure(RAW) was adjusted for the over and underexposed shots to match the correct exposure.
Processing for film is as follows:
1. Capture Analog
2. Remove film
3. Drop off at (or ship to) local photo lab
4. Pick up (or receive by mail) scans and processed film
5. Open files from CD in Photoshop
And that's it! No further adjustments necessary! But you can go from there and do whatever your heart desires. :) My film is already backed up on negatives which are analog, low tech and archival to last 200 plus years! Now which process seems like the more efficient use of a professional's time? Hmmm... I know very few professionals who are comfortable farming out their post-processing work to someone else. A digital professional's "style" is usually shaped by their unique approach to post-processing. I.E. Trever Heone.
The film scans were done on a Fuji Frontier scanner with no variable contrast setting, and no enhancements whatsoever. The only control was exactly what control you have when printing color in the darkroom: + or - density, R or C, G or M, B or Y color adjustments, and that's it.
So are you all ready to see the results? Well you asked for it!
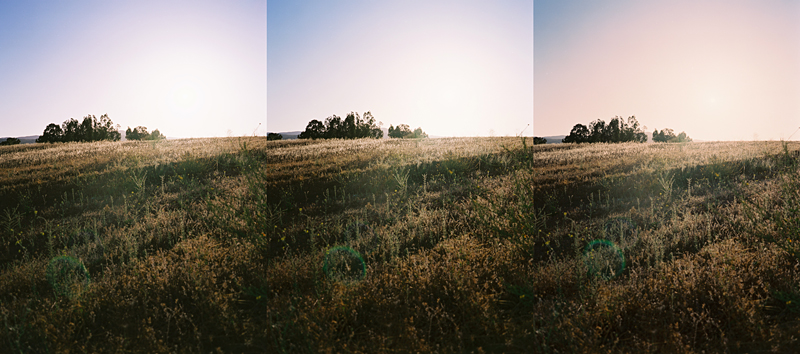
Let's start with an easy one shall we? The back-lit landscape.
FILM
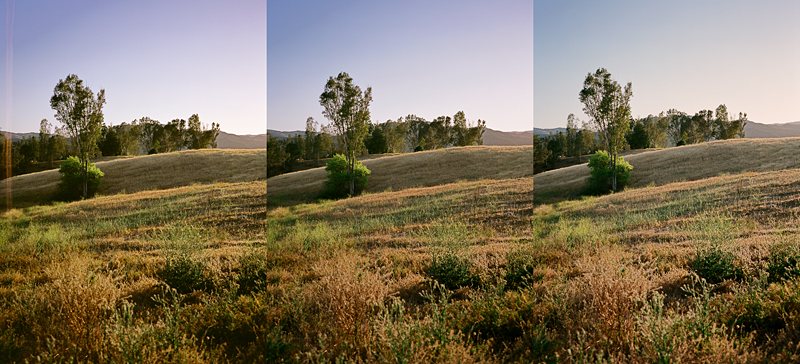 Exposure (Left to Right): 1/500s, 1/125s, 1/30s @ f/8
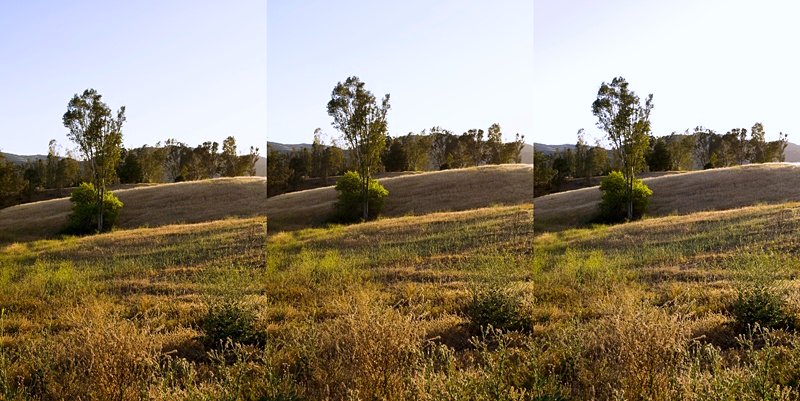 DIGITAL
Here both film and digital didn't do too bad with the over and underexposed frames. But film clearly has more pleasing tonal value and color separation. It would take some work to get those colors in the digital. Digital looses nearly all gradient in the sky at +2 but Film just gets a bit creamier. Mmmm... I could use a good cappuccino right about now. ;) Now let's look closer!
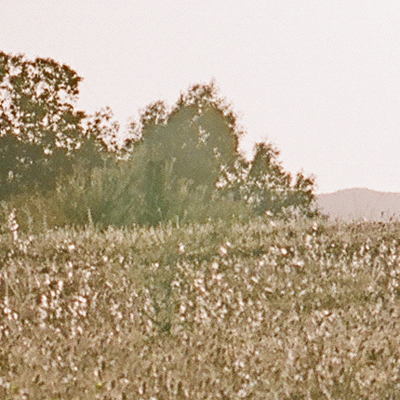
FILM...DIGITAL
DIGITAL
Here both film and digital didn't do too bad with the over and underexposed frames. But film clearly has more pleasing tonal value and color separation. It would take some work to get those colors in the digital. Digital looses nearly all gradient in the sky at +2 but Film just gets a bit creamier. Mmmm... I could use a good cappuccino right about now. ;) Now let's look closer!
FILM...DIGITAL
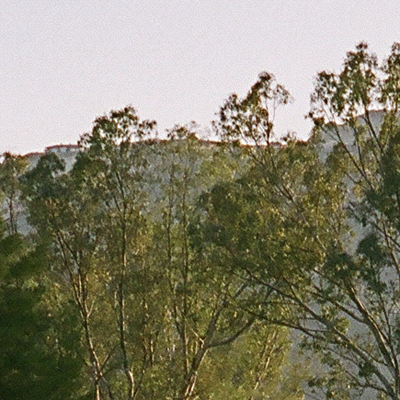
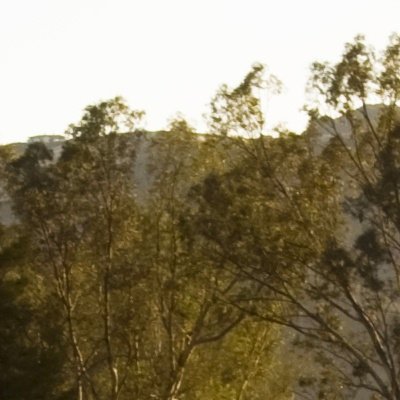 If you didn't notice the film shot was a bit wider than the digital shot. I slightly misjudged the angle of view for the Fuji. It worked out well though because the film scans were just under 17mp in size while the D300 shoots at only 12.3mp. Like that is what matters! :) So at 100% both images show the same scale of the image. You'd think this would play to D300's advantage right? We'll not enough apparently. Look at the detail in the branches and in the house chimneys on the film! There is a little grain but it's better than the fuzzy interpolation the digital capture gets. I like grain actually. It makes it feel more three dimensional. And the color rendition! The greens and blues are so much clearer on film! And lets not forget the bleeding highlights!
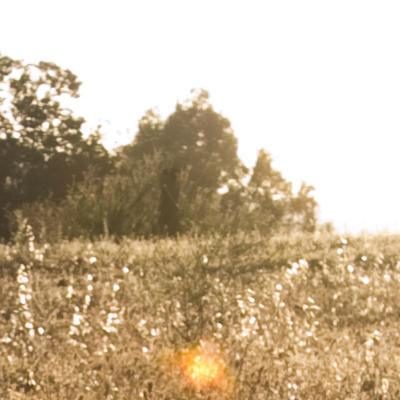
Now lets step it up a notch. I was feeling saucy so I went ahead and shot directly into the sun.
FILM
If you didn't notice the film shot was a bit wider than the digital shot. I slightly misjudged the angle of view for the Fuji. It worked out well though because the film scans were just under 17mp in size while the D300 shoots at only 12.3mp. Like that is what matters! :) So at 100% both images show the same scale of the image. You'd think this would play to D300's advantage right? We'll not enough apparently. Look at the detail in the branches and in the house chimneys on the film! There is a little grain but it's better than the fuzzy interpolation the digital capture gets. I like grain actually. It makes it feel more three dimensional. And the color rendition! The greens and blues are so much clearer on film! And lets not forget the bleeding highlights!
Now lets step it up a notch. I was feeling saucy so I went ahead and shot directly into the sun.
FILM
 Exposure (Left to Right): 1/500s, 1/125s, 1/30s @ f/8
 DIGITAL
Stunning! I really don't know what else to say... The color, the continuity, and OMG the highlight detail! You can see the sun on film! Even at +2! A little round circle in the sky with a soft gradient moving outward. I dare anyone to shoot directly into the sun with any digital camera out there, and give me tonality and detail from the shadows all the way to the the surface of the sun. I have yet to see it done on any digital. It happens on film everyday. And detail?
FILM...DIGITAL
DIGITAL
Stunning! I really don't know what else to say... The color, the continuity, and OMG the highlight detail! You can see the sun on film! Even at +2! A little round circle in the sky with a soft gradient moving outward. I dare anyone to shoot directly into the sun with any digital camera out there, and give me tonality and detail from the shadows all the way to the the surface of the sun. I have yet to see it done on any digital. It happens on film everyday. And detail?
FILM...DIGITAL
 What the heck is with digital forgetting to record the hill on the skyline? All these detail shots are taken from the accurate exposures by the way. But even if I process the -2 digital the hill still is nowhere to be found! Film does have a color cast when overexposed. But digital has nothing so the point is moot. I could clean out the color cast without too much effort if I scanned these at home or just in Photoshop. And digital is more neutral but it is also less dimensional when it comes to color. Film gives you HDR in one exposure while digital requires multiple and extra time in post production.
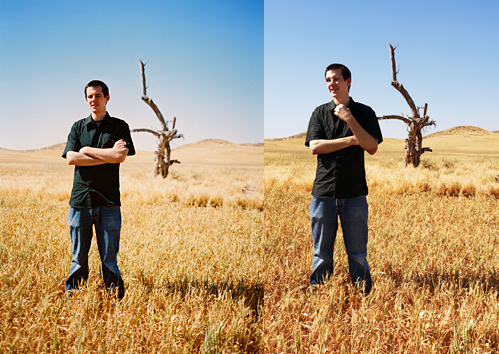
Let's move on to something a bit different now shall we? Hows about a portrait? Say split lighting using the sun in an open field.
FILM
What the heck is with digital forgetting to record the hill on the skyline? All these detail shots are taken from the accurate exposures by the way. But even if I process the -2 digital the hill still is nowhere to be found! Film does have a color cast when overexposed. But digital has nothing so the point is moot. I could clean out the color cast without too much effort if I scanned these at home or just in Photoshop. And digital is more neutral but it is also less dimensional when it comes to color. Film gives you HDR in one exposure while digital requires multiple and extra time in post production.
Let's move on to something a bit different now shall we? Hows about a portrait? Say split lighting using the sun in an open field.
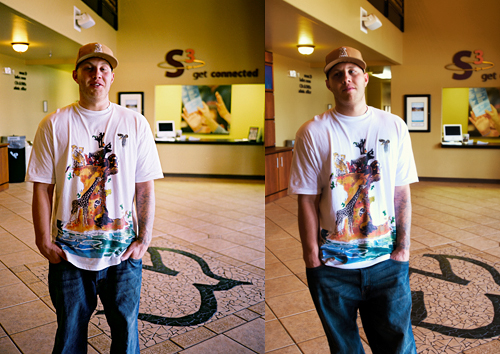
FILM
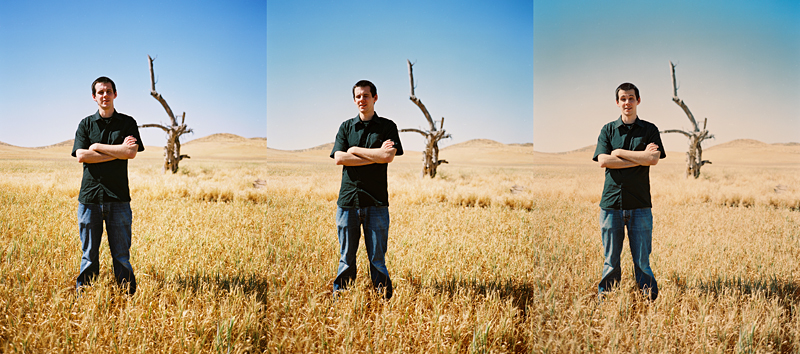 Exposure (Left to Right): 1/500s, 1/125s, 1/30s @ f/8
 DIGITAL
And for the close up?
FILM...DIGITAL
DIGITAL
And for the close up?
FILM...DIGITAL
 The difference isn't too hard to see here. Especially at +2. Color is sooo much better in the Reala! The Digital could definitely be improved in Photoshop but with the same amount of time you could really dial in and some have fun with the film. And personally I'd rather be hanging out with friends or shooting more photos than spending hours in a cave editing digital files in curves and with film emulation filters.
Next we can look at a portrait with a bit more desirable lighting. Window light in an open foyer.
FILM
The difference isn't too hard to see here. Especially at +2. Color is sooo much better in the Reala! The Digital could definitely be improved in Photoshop but with the same amount of time you could really dial in and some have fun with the film. And personally I'd rather be hanging out with friends or shooting more photos than spending hours in a cave editing digital files in curves and with film emulation filters.
Next we can look at a portrait with a bit more desirable lighting. Window light in an open foyer.
FILM
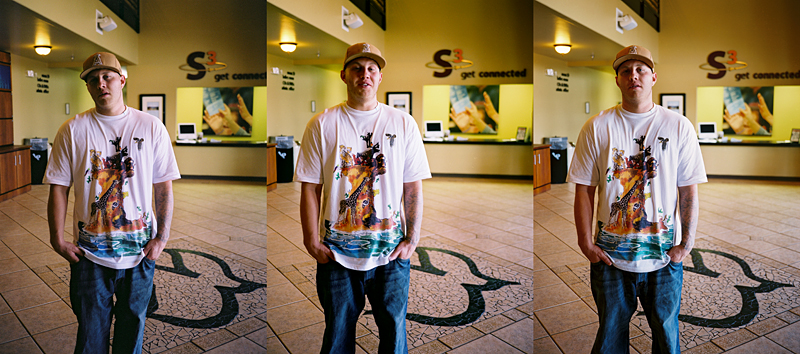 Exposure (Left to Right): 1/30s, 1/8s, 1/2s @ f/4 (had to open up a stop here)
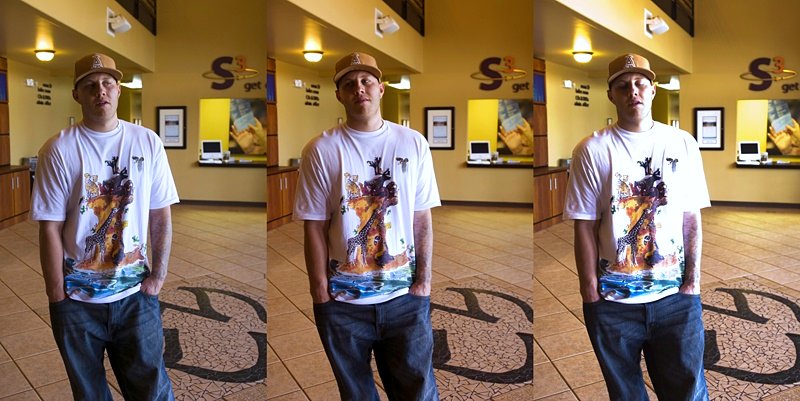 DIGITAL
Can we stop now? This is getting redundant! "It's round four and film with the consistent advantage in this match deals a heavy blow once again to digital!" Really, which of these looks the most natural?
FILM...DIGITAL
DIGITAL
Can we stop now? This is getting redundant! "It's round four and film with the consistent advantage in this match deals a heavy blow once again to digital!" Really, which of these looks the most natural?
FILM...DIGITAL
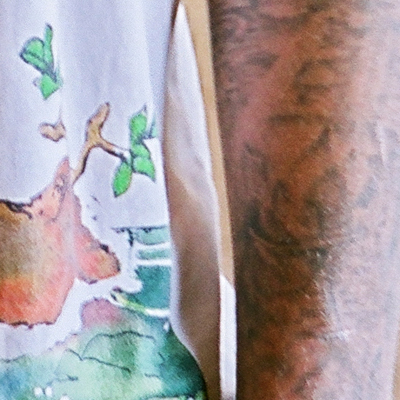
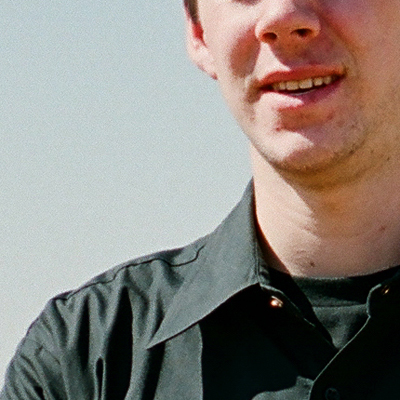
 With such soft light you would think that digital would perform better. But with the white shirt you have clipping highlights in all 3 exposures. On film you can see definition in his arm hairs! I really could stop here for mercy but the fight must go on!
For our last example we have a motorcycle in the DMV parking lot.
FILM
With such soft light you would think that digital would perform better. But with the white shirt you have clipping highlights in all 3 exposures. On film you can see definition in his arm hairs! I really could stop here for mercy but the fight must go on!
For our last example we have a motorcycle in the DMV parking lot.
FILM
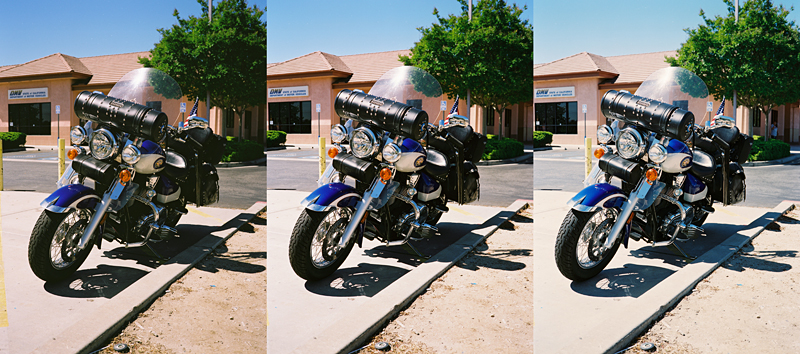 Exposure (Left to Right): 1/500s, 1/125s, 1/30s @ f/8
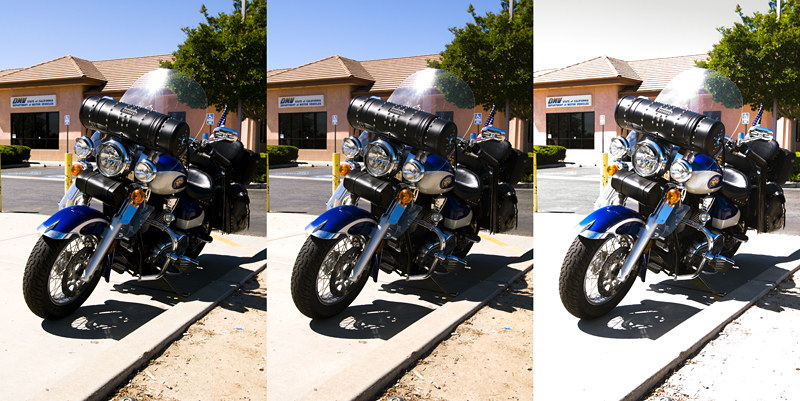 DIGITAL
At first glance I like the film better because of the color among other subtle differences. But the digital doesn't look awful. Right? Well with exception to the +2 exposure the digital could pass for acceptable at this size. But if you were to even print it at 4x6 there would be a much more obvious difference.
FILM...DIGITAL
DIGITAL
At first glance I like the film better because of the color among other subtle differences. But the digital doesn't look awful. Right? Well with exception to the +2 exposure the digital could pass for acceptable at this size. But if you were to even print it at 4x6 there would be a much more obvious difference.
FILM...DIGITAL

 Color in the shadows is so much more vibrant, yet the highlights are far from lost. Spectral highlights made from the sun like these are only preserved in film. From one end of the spectrum to the other the color and detail is several steps above digital. Some people don't care about washed out highlights. And that's fine if you want to turn background completely white or print an image on high contrast paper but I believe that should be your choice and not the camera's.
Especially while shooting the splendidly serendipitous moments of a wedding, you don't want to worry about if the exposure is within 1/3 of a stop of the general scene. And any digital photographer will tell you that if you have to look at a shot on the back of a camera you didn't get it. A photographer knows when they "have the shot" the millisecond before the shutter is released, and chimping can only help a photographer to miss the moment they really wanted. When you shoot a wedding and the bride is walking from shadows to sunlight during the ceremony you don't have time to "chimp" the screen. You'll miss the moment. Same applies for street photography and and many other areas of photography. If we displayed 5 stops of forgiveness here with film, and still are getting workable exposures, why not shoot film? With digital you might have the ideal exposure and still lose a part of the scene due to it's inferior dynamic range. With film you can try to get within a couple of stops of the ideal exposure and be just fine. Now you're left to your real job; finding the light in each moment and capturing the composition artfully and in it's entirety on analog film. When all light is available for capture, you're left to simply find the right light to captivate.
Though the majority of professionals are shooting digital now that is no measurement of what is better. It's merely a sign of the times and of what is popular today. The best of the best and nearly all of the fine art world still use film! Those of us who do not want to compromise for the sake of the trends still shoot film. Only film gives you complete access to all the information captured from highlights to shadows and still retain snappy contrast and color to boot. Only film will stand the test of time, lasting centuries longer than any of the ever changing file formats and storage devices. Only film gives you the freedom to shoot and forget about buying a cushy desk chair or failing eyesight from staring at a computer monitor all day long. Only film can make me smile! :)
Color in the shadows is so much more vibrant, yet the highlights are far from lost. Spectral highlights made from the sun like these are only preserved in film. From one end of the spectrum to the other the color and detail is several steps above digital. Some people don't care about washed out highlights. And that's fine if you want to turn background completely white or print an image on high contrast paper but I believe that should be your choice and not the camera's.
Especially while shooting the splendidly serendipitous moments of a wedding, you don't want to worry about if the exposure is within 1/3 of a stop of the general scene. And any digital photographer will tell you that if you have to look at a shot on the back of a camera you didn't get it. A photographer knows when they "have the shot" the millisecond before the shutter is released, and chimping can only help a photographer to miss the moment they really wanted. When you shoot a wedding and the bride is walking from shadows to sunlight during the ceremony you don't have time to "chimp" the screen. You'll miss the moment. Same applies for street photography and and many other areas of photography. If we displayed 5 stops of forgiveness here with film, and still are getting workable exposures, why not shoot film? With digital you might have the ideal exposure and still lose a part of the scene due to it's inferior dynamic range. With film you can try to get within a couple of stops of the ideal exposure and be just fine. Now you're left to your real job; finding the light in each moment and capturing the composition artfully and in it's entirety on analog film. When all light is available for capture, you're left to simply find the right light to captivate.
Though the majority of professionals are shooting digital now that is no measurement of what is better. It's merely a sign of the times and of what is popular today. The best of the best and nearly all of the fine art world still use film! Those of us who do not want to compromise for the sake of the trends still shoot film. Only film gives you complete access to all the information captured from highlights to shadows and still retain snappy contrast and color to boot. Only film will stand the test of time, lasting centuries longer than any of the ever changing file formats and storage devices. Only film gives you the freedom to shoot and forget about buying a cushy desk chair or failing eyesight from staring at a computer monitor all day long. Only film can make me smile! :)
POST SCRIPT/FINAL NOTES
Other References:
Why the D300 and not the D3 or D700?
What about digital's performance at high ISO?
I didn't have time to get into the high ISO stuff. In my experience though I prefer 800z with it's grain over digital. Anything over ISO 800 I would shoot B&W. But if I wanted color above 800 digital would be the way to go.
Couldn't these digital files look better?
Here are a few examples of the more enhanced digital files vs. the film. Color looks better in these but not a huge difference.
Some great professional photographers who still choose film:
COMMERCIAL
WEDDING
Some photographers who really know how to get the most out of digital capture:
Our film photography work can also be found on these two web sites: